
Iterating Your Way to a Great Prompt for your LLM
A great prompt is created in the school of hard knocks

(Skip to the end of the article for a summary if you’re too lazy to read the detailed examples.)
Here’s a photo taken by my friend. I asked ChatGPT o3 to figure out where it is from, and o3 gave an astonishingly accurate answer “Falls of Dochart, Killin, Perthshire/Stirling, Scotland. Approx. coords 56.463 ° N , -4.320 ° W (centre of the rapids under the old Bridge of Dochart).” My friend points out that this is “Bang on!”
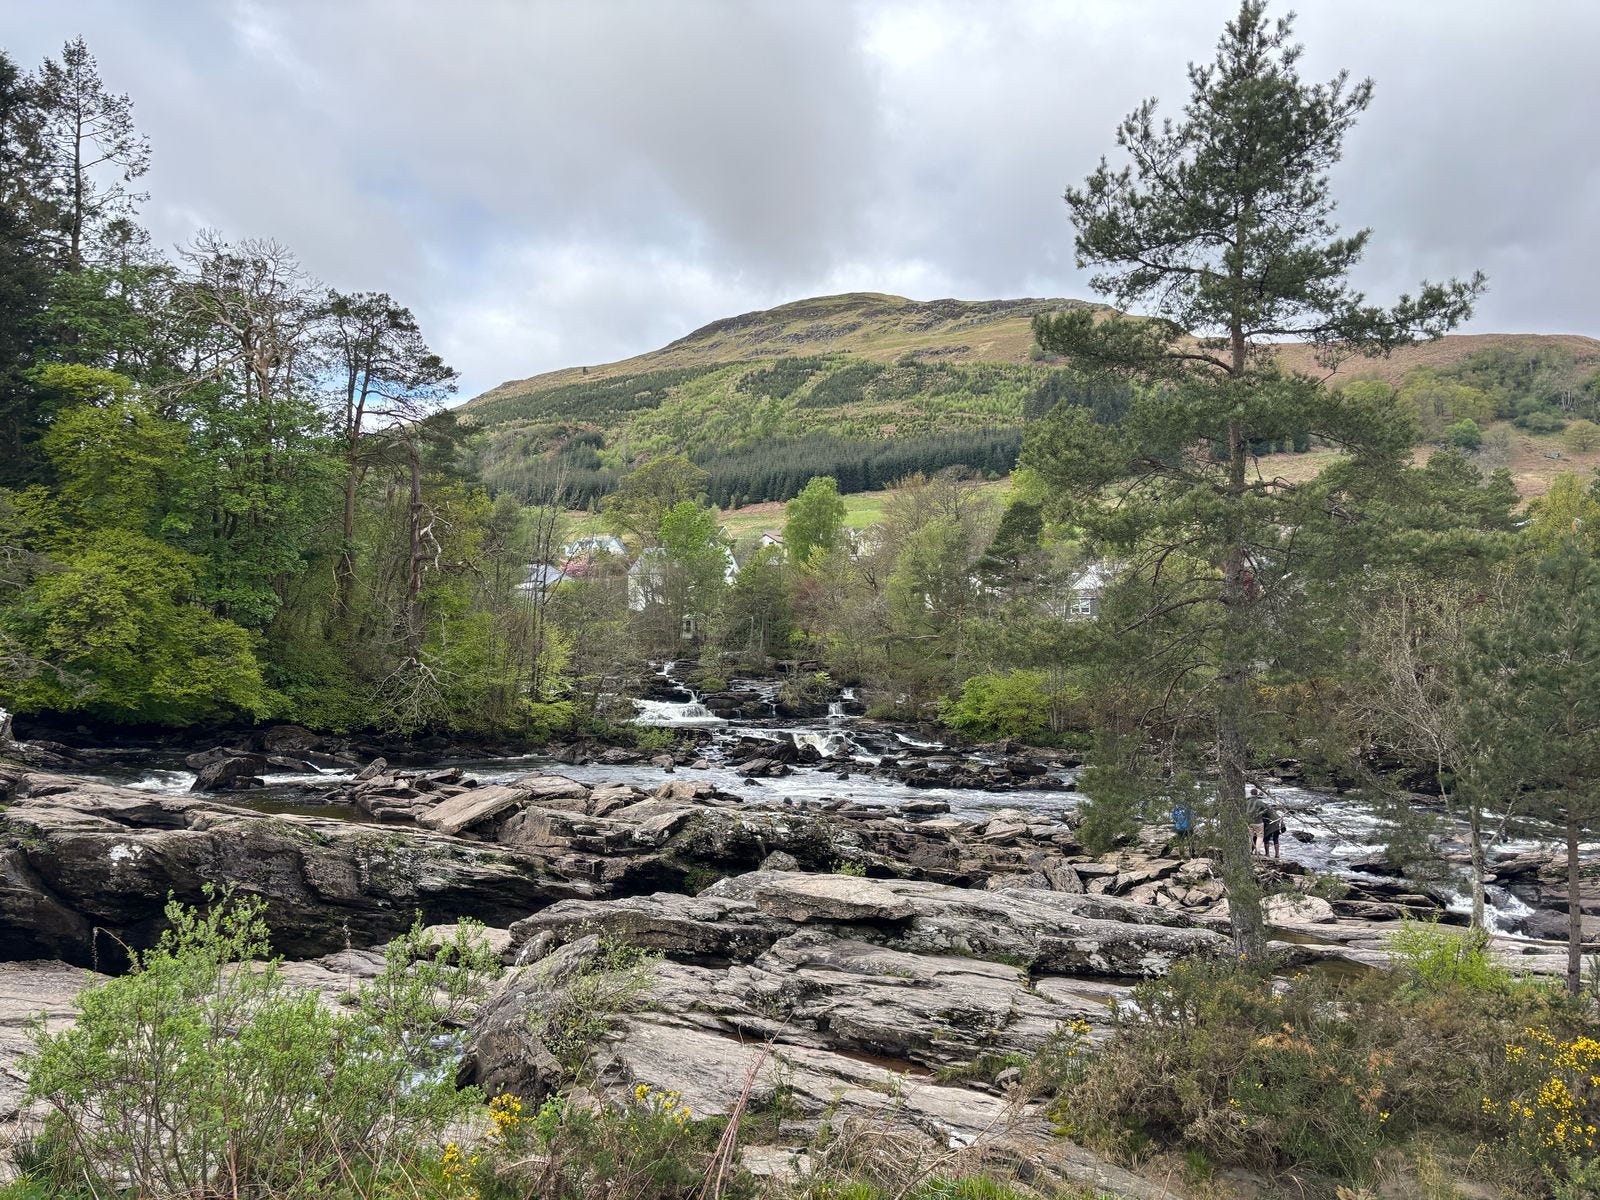
You can see o3's thought process here, and it is very impressive.
But this article isn’t about o3’s geoguessing abilities. If you clicked on the link above, you would have noticed that the prompt I used was insanely detailed and complex. This article is about how to write such prompts to supercharge all your LLM uses.
Here’s the prompt I used. (You don’t have to read the whole thing in detail, just skim through it.)
You are playing a one-round game of GeoGuessr.
Your task: from a single still image, infer the most likely real-world location.
Note that unlike in the GeoGuessr game, there is no guarantee that these images are taken somewhere Google's Streetview car can reach: they are user submissions to test your image-finding savvy. Private land, someone's backyard, or an offroad adventure are all real possibilities (though many images are findable on streetview).
Be aware of your own strengths and weaknesses: following this protocol, you usually nail the continent and country. You more often struggle with exact location within a region, and tend to prematurely narrow on one possibility while discarding other neighborhoods in the same region with the same features. Sometimes, for example, you'll compare a 'Buffalo New York' guess to London, disconfirm London, and stick with Buffalo when it was elsewhere in New England - instead of beginning your exploration again in the Buffalo region, looking for cues about where precisely to land. You tend to imagine you checked satellite imagery and got confirmation, while not actually accessing any satellite imagery.
**Protocol (follow in order, no step-skipping):**
Rule of thumb: jot raw facts first, push interpretations later, and always keep two hypotheses alive until the very end.
0 . Set-up & Ethics
No metadata peeking. Work only from pixels (and permissible public-web searches).
Flag it if you accidentally use location hints from EXIF, user IP, etc.
Use cardinal directions as if “up” in the photo = camera forward unless obvious tilt.
1 . Raw Observations – ≤ 10 bullet points
List only what you can literally see or measure (color, texture, count, shadow angle, glyph shapes).
No adjectives that embed interpretation. Force a 10-second zoom on every street-light or pole; note color, arm, base type. Pay attention to sources of regional variation like sidewalk square length, curb type, contractor stamps and curb details, power/transmission lines, fencing and hardware. Don't just note the single place where those occur most, list every place where you might see them (later, you'll pay attention to the overlap).
Jot how many distinct roof / porch styles appear in the first 150 m of view. Rapid change = urban infill zones; homogeneity = single-developer tracts. Pay attention to parallax and the altitude over the roof. Always sanity-check hill distance, not just presence/absence. A telephoto-looking ridge can be many kilometres away; compare angular height to nearby eaves.
Slope matters. Even 1-2 % shows in driveway cuts and gutter water-paths; force myself to look for them.
2 . Clue Categories – reason separately (≤ 2 sentences each)
Category Guidance
Climate & vegetation Leaf-on vs. leaf-off, grass hue, xeric vs. lush.
Geomorphology Relief, drainage style, rock-palette / lithology.
Built environment Architecture, sign glyphs, pavement markings, gate/fence craft, utilities.
Culture & infrastructure Drive side, plate shapes, guardrail types, farm gear brands.
Astronomical / lighting Shadow direction ⇒ hemisphere; measure angle to estimate latitude ± 0.5
Separate ornamental vs. native vegetation
Tag every plant you think was planted by people (roses, agapanthus, lawn) and every plant that almost certainly grew on its own (oaks, chaparral shrubs, bunch-grass, tussock).
Ask one question:
“If the native pieces of landscape behind the fence were lifted out and dropped onto each candidate region, would they look out of place?”
Strike any region where the answer is “yes,” or at least down-weight it.
°.
3 . First-Round Shortlist – exactly five candidates
Produce a table; make sure #1 and #5 are ≥ 160 km apart.
| Rank | Region (state / country) | Key clues that support it | Confidence (1-5) | Distance-gap rule ✓/✗ |
3½ . Divergent Search-Keyword Matrix
Generic, region-neutral strings converting each physical clue into searchable text.
When you are approved to search, you'll run these strings to see if you missed that those clues also pop up in some region that wasn't on your radar.
4 . Choose a Tentative Leader
Name the current best guess and one alternative you’re willing to test equally hard.
State why the leader edges others.
Explicitly spell the disproof criteria (“If I see X, this guess dies”). Look for what should be there and isn't, too: if this is X region, I expect to see Y: is there Y? If not why not?
At this point, confirm with the user that you're ready to start the search step, where you look for images to prove or disprove this. You HAVE NOT LOOKED AT ANY IMAGES YET. Do not claim you have.
Once the user gives you the go-ahead, check Redfin and Zillow if applicable, state park images, vacation pics, etcetera (compare AND contrast). You can't access Google Maps or satellite imagery due to anti-bot protocols. Do not assert you've looked at any image you have not actually looked at in depth with your OCR abilities. Search region-neutral phrases and see whether the results include any regions you hadn't given full consideration.
5 . Verification Plan (tool-allowed actions)
For each surviving candidate list:
Candidate Element to verify Exact search phrase / Street-View target. Look at a map. Think about what the map implies.
6 . Lock-in Pin
This step is crucial and is where you usually fail. Ask yourself 'wait! did I narrow in prematurely? are there nearby regions with the same cues?' List some possibilities. Actively seek evidence in their favor. You are an LLM, and your first guesses are 'sticky' and excessively convincing to you - be deliberate and intentional here about trying to disprove your initial guess and argue for a neighboring city.
Compare these directly to the leading guess - without any favorite in mind. How much of the evidence is compatible with each location? How strong and determinative is the evidence?
Then, name the spot - or at least the best guess you have.
Provide lat / long or nearest named place.
Declare residual uncertainty (km radius).
Admit over-confidence bias; widen error bars if all clues are “soft”.
Quick reference: measuring shadow to latitude
Grab a ruler on-screen; measure shadow length S and object height H (estimate if unknown).
Solar elevation θ ≈ arctan(H / S).
On date you captured (use cues from the image to guess season), latitude ≈ (90° – θ + solar declination). This should produce a range from the range of possible dates.
Keep ± 0.5–1 ° as error; 1° ≈ 111 km
No, I did not write this prompt myself. I stole it from Kelsey Piper. The first thing I want to notice about the prompt is this:
Good prompts are extremely detailed
The second ever post on this substack was about the fact that good prompts need to be detailed. Here’s a quick image to drive home the point. The first prompt below is an example of the kinds of prompts that most people use. But the output you get will be increasingly better as you go down the list:

What does a good prompt contain? Here’s an example showing a breakdown:

Rule #2 of good prompting:
A good prompt gives the LLM a goal, a role to play, step-by-step instructions (DOs), constraints (DONTs), and suggestions for personalising the answer to your situation
You might complain that this seems like a lot of work. But, by now, you should know that if anything “seems like a lot of work,” then the first step to make your life easier is to use an LLM!
Use an LLM to create the first version of your detailed prompt. Then use your judgment/expertise to modify it.
For example, if you regularly use LLMs for summarising research papers, you should use a detailed prompt. As a first step, tell an LLM, “Help me to create a detailed, structured prompt for an LLM that I can use to summarize research papers for my work. Ask me any relevant questions before finalizing the prompt.” Now, the LLM will ask you some questions and come up with a fairly detailed prompt that serves as a good starting point.
But Kelsey’s detailed prompt isn’t really the result of an LLM. This brings us to the most important technique in creating a prompt

Everything great comes from starting with a rough draft, and then iterating to fix problems one by one (this is also related to the OODA loop, about which I really need to write an article someday.)
Iterate your way to a great prompt. Every time you use a prompt, look for areas of improvement (or ask the LLM to spot them) and edit the prompt appropriately.
Specifically, start with the LLM-generated prompt, then start using it, and after every use, critically check the output for things you didn’t like. Be a demanding boss of the LLM, and point out the problems and ask it to fix them. You can even feed the answer back to the same (or different) LLM and ask it to identify areas of improvement. This is called “LLM-as-a-Judge”. In either case, the problems will be of two types: 1. problems that are specific to this instance, and are unlikely to repeat, and 2. problems that are general and likely to repeat. In case of problems of the second type, you should edit the original prompt to add new instructions to avoid those problems. Every iteration of this will give you a more improved prompt. (You’ll notice that this is similar to training an assistant to do a better job during the first few months.)
Of course, not all prompts need to be so detailed. Only the ones you’re going to use repeatedly, or the ones where the quality of the output is very important to you.
To summarise, these are the rules for creating great prompts:
Good prompts are extremely detailed
A good prompt gives the LLM a goal, a role to play, step-by-step instructions (DOs), constraints (DONTs), and suggestions for personalising the answer to your situation
Use an LLM to create the first version of your detailed prompt. Then use your judgment/expertise to modify it.
Iterate your way to a great prompt. Every time you use a prompt, look for areas of improvement (or ask the LLM to spot them) and edit the prompt appropriately.
Should have read this earlier
Great article Navin. Thanks for sharing. I have been working on improving my prompts, and have recently learned that I should use the “Constraints → Context → Task” (C‑C‑T) method, or better still the "role + C‑C‑T‑F" method, the 'F' means format such as markdown, JSON schema, table. THis article will be helpful.